Friday, June 29, 2012

Converting Text to Graphic


Morning guys!
Today I feel so energetic whereas I still can’t find my lector for signing my assignment. Maybe because I woke up very early at 4am. Hahaha. Okay, let’s skip this, because with my fresh spirit, suddenly I thinking of a simple tips. Maybe it’s a common tips, but if you never heard about it, it’s okay. I’ll talk about it now.
Have u ever faced when you’ve finished your design, and you including the text into that. Then you give the file to your friend or your teacher if it’s an assignment. They told you that they can’t see those cool font you made for them. And they also told you that they don’t have  those font type so the window came up when they open your file. Asking for substitute your  font (which is didn’t exist on their computer) with the other font.
So here’s my simple tips. You can easily attach those font type into your design package. OR, you don’t need to attach it but your font won’t change.
How to do it?
After you add text into your design, what you have to do is converting your text into graphic/curve. How?
If you work on Photoshop, go to your text layer, right click, choose “Rasterize Type”.
If you work on CorelDRAW, select the text, then right click on it, choose “Covert to Curve”

NOTICE: Here’s the notice for you. Once you convert your text into a graphic, you can’t edit your text anymore. So, make sure if your text is exactly what you want before you convert it.
Okay, that’s the simple tips for today. You can’t imagine how simple tips like this can be useful someday. Just remember of it. If you are like designing, I believe you’ll be need it.

Cheers!

How to make a Splash in CorelDRAW


Yesterday, I’ve visited my classmates at the boarding house to do my coursework. Recent days, I’m very busy working on my assignment because several months before I forget almost all of my duty to pursue my passion in design.
When I came into his room, my friend was too busy designing his Web page. I sat down and opened my laptop when my friend asked "Pin, do you know how to make a splash in  Corel". I am a little confused for a moment, thinking. Then I asked my friend, "What kind a splash do you want?"
He shows the splash of water. I understand, then I try to make it in CorelDRAW. After a few moments, finally I can make a splash like my friend wanted.
if you are also wondering how to make a splash in corel?
Here's the tutorial!

First off all.  You should open a new project in Corel. You can press CTRL + N or click on the bar.
Then when a blank area has served, now find the Elipse Tool and press it. If you couldn’t find it. Just press F7.
Now, move on your design area, drag the cursor create new circle. Don’t forget to press CTRL to make it perfect.

After you’ve created the first circle. We need to create smaller circle. I’ll create 3 circles more with various size but it mustn’t bigger than the first circle. Use elipse tool and drag again or you can just duplicate the first circle (CTRL + D) then resize it.


We need to make all the circle connect to point (biggest circle). So we need to use Bezier tool to create custom shapes. You can use another tools but I feel comfort with this one. Click on Bezier tool, then click on any place to create custom shape to connecting little circle to the point. Do it again to another.


Here’s after you finished connecting all circle to the point.

Then, select all objects. Use your mouse or press CTRL + A. The combination commands will appear on the bar.

Here is the combination bar.

Press “Weld” from the combination bar to merge all objects into a new form.

Now, go to shape tool and click to the object.

After you clicked the object, right click on the line of the object, choose “Add”. Or you can simply double click to do the same thing.

It use to add new node to the object so we can transform or change its structure. Do again on the other side so we have two new nodes (highlighted).

Do it to the other side so make we have total 6 new nodes.

Next, I’ll remove the nodes which makes bridge of two circle (Each brigde has 4 nodes). Remove all of the nodes (Total 12 nodes - highlighted)

then you’ll get new shape like this.

The last thing we need to make it looks like a splash is colouring it. And here’s the result. .
Tadaaaaaa!!!!

About the coloring, I’ll post it in the next article. Stay tune!
REMEMBER!

It’s not talent that make us great, but our practices of it!

Sunday, June 24, 2012

Simple Photo Retouch


Simple Retouch Photo
When I’m on surfing in the internet, I visited one of the famous forum in my country, KASKUS. As always, I visited Lounge and start to read every thread which looks interesting for me. Then I see one thread which makes me interested. The title is ”Dewa Photoshop dari Jojga gan!!” means “God of Photoshop from Jogja!”. If you’re interested to, right click to open this link in new tab or new window.
I saw that most user admire and amazed with the works. The photos is retouched using Photoshop from a grayscale photo into a new look of colorful photo even the color is smooth. I scroll down the page to see the collection until I realized in one of the photo. Shown traditional Jogja’s army in green suit. I felt a little bit strange because the color of its suit didn’t look natural. It almost looks same color with the army under the shade.
So, I’m interested to do a little work to try what that people have done. I’ll try to retouch one of the photo from the collection and I pick this one.

It shown the Indonesian women wore traditional java dress (kebaya) and hold umbrella to cover her from the sun.
I open it in photoshop like this,

What i want to do is to give a little touch to the left photo with color so makes it looks like the right. Here we go to the delicious part!. Create new layer, press Ctrl + Shift + N, give it a name. Now, zoom in the project using zoom tool or press "Z" and press the left click to pointing your zoom like this.

Now, I will start to use polygonal lasso tool to select the area where I want to change. Start with the cloth.

After  selection, I will choose the color to be implemented for the cloth. I will use foreground color and choose the color suit me. I choose dark green.

And then, I press Alt+Del to fill the selection with it.

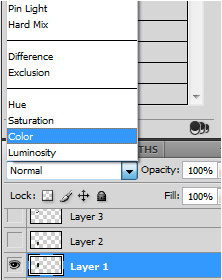
Now, I’ll go to  Layers window, click to the layer where contains the color selection. Then click on the drop down blending options menu. And select “color”

Look at the project again, and  VOILA! The cloth now has its color!
If you hesitate with  the color, you can adjust it. Go to image -> Adjustment -> Hue/Saturation.

New box will appear. There are 3 sliders in there. Move the Hue to change the color of the cloth.

You also can try to move other slider to see what happen.

Here is the sample what I’ve done using Hue.
If you want to do more, you can try to retouch other area or other photo with the same way I do it before. So  when I finish it,the photo can be looks like this.